Sunday 27 February 2011

Disaster!

We spent the weekend away at a family party - more soon, when I've gone through the photos.

So we drove home this afternoon and didn't plan on doing much for the rest of the day, except relaxing.  The Boys had a model-painting project on the go, followed by a networked computer gaming session. 

I settled down happily in my studio, with some nice new covering paper, cutting pages and boards for a new book.  I had  finished the pages and interleaves for a photo album and reached up to put the art bag containing the rest of the tissue and interleaving papers back onto its shelf. 

Disaster struck! 

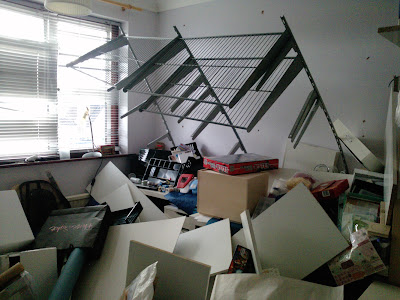
The shelves in my studio came away from the wall.  Everything cascaded down on top of me (and Sherlock), tipping me into a heap in the middle of it all!  DH and DS had to come running to help us - DS rescued the poor, frightened cat and DH rescued his poor, frightened wife!

It was all a huge jumble of fallen boxes and packs of paper, books, trays of bits & pieces, board games from the top shelf, shelving boards etc etc. 

Added to the mess was the anxiety that the wall brackets would break, landing those metal shelves on top of us.  We had to very gingerly clear up whatever we could, moving it all out of the room and stacking shelf boards in the hallway.  Then DH helped me to take down the brackets from the bent and twisted metal supports.  Once we had done this, he carefully removed all three metal shelves and took those away too.  

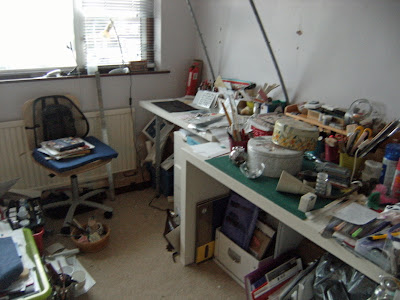
My poor Studio, that I was so proud of!  It's a terrible mess... Piles of stuff all over the desk top and under the desk, all over the floor...

There were some boxes already on the floor along this side, waiting to be tidied up and for their contents to be put on the shelves (!).  Now they are just part of a large and general jumble. 

In the centre there, topped by a sheet of blue mulberry paper, are the pages and sheet of covering paper for my new photo album project.  The lovely paper has two big holes, where corners of shelf boards speared it!  Yet, in spite of the chaos, the damage to this project was minimal and it looks as if I'll be able to make it after all  - some time! 


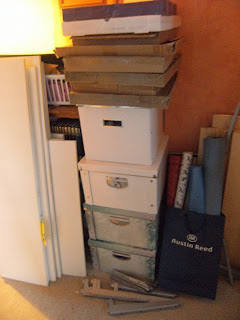
Everything else has had to be moved into the upstairs hallway, or our bedroom.  I have managed to relocate my paper stocks to the bottom of my wardrobe, although the cover-bags are just a little bit too deep and the doors don't shut properly.  It's going to have to do for now, until we can sort out what to do next.

I have had to clear the desk by the window; it's my "clever" desk, with adjustable legs - legs that clip to the metal shelving strips that are (were) screwed to the wall.  It will need to be taken apart now, so the metal strips can be taken down completely.

My laptop computer was on the desk when everything fell. I am so lucky it wasn't damaged at all.  In fact, so far, apart from the wrecked shelving and a few dented boxes (one full of sock-pet making stuff, that I fell on and squashed!), hardly anything was damaged or broken.  The paper I was about to use for the photo album cover has two holes - but I think the sheet can still be used for something, as the holes are at the edges.  A little ceramic pot I used to hold "bits" was smashed and I threw it out, the handle of a paint-brush mug was broken and a lot of little shreds of paper and bits of cotton, bookbinding thread and stuff were scattered over the floor - should have tidied them up before anyway! 

No-one was injured, though the cat was very frightened and had to be lifted out from under the pile of stuff (unsquashed though, so he was lucky). He recovered well, after a lot of kind attention from J.  I was badly shaken up and needed a stiff cuppa and a chocolate, along with a sit-down, before my knees would stop wobbling and my hands shaking.  Other than that, it's just a matter of injured pride and disappointment. 

I will need to have another think about the storage situation in my studio. Meanwhile, that pile of stuff that I've been "going to" tidy up, will have to be tidied, so I can make a much neater pile of storage boxes, containing all my equipment, scrapping supplies etc, that used to be on the shelves. 

This is obviously my own fault. The shelves must have been overloaded and me dropping a bag of paper on top of the pile was just one thing too much - that tiny bit of force needed to pull it all away from the wall. We had put the supports up carefully and used good, long screws. I think there was just far too much weight overall, pulling constantly at those metal strips. At least I wasn't sitting down when it fell, or I would have been injured by the falling shelf-boards.


Obviously wall-mounted shelving is not the solution to every storage issue! Overloading shelves is dangerous and foolish (duh!!) and I won't make that mistake again.  I was in J's room after this, checking what is on his wall shelves - nothing nearly as heavy as the things I had dumped on mine!

So, I have stopped shaking and am having an early night (8pm, sitting in bed!).  Tomorrow is Monday - jobs day - so I will have to leave things as they are.  Tuesday will have to be the start of the Big Tidy Up!

As if I had nothing else to do, eh?

Friday 25 February 2011

Peacocks, Posies, Cards and Cats!

Update!

Just to complete the story of the Peacock Wedding Album, I posted it yesterday, in a special presentation/storage box:
I had a large, plain white box with acetate lid, which I covered with deep blue mulberry paper. 
The inside dimensions of the box were a tiny bit larger than the book - quite handy really, as I was able to add some extra support and protection for the book, by covering cork strips with mulberry tissue, fixing them round the inside of the box and covering them at the same time as the rest of the box, so it was all "fitted" and matching inside. 

I wrapped the book in blue tissue, added a bit of decoration and put the lid on (acetate does not photograph well, so I haven't bothered with that picture!).

Then I wrapped the whole thing in my shop colours - white tissue, wine-red ribbon - packed it in a pizza box, took it to the post office and sent it off to its new home.  I'm waiting to hear that it arrived safely and what the customer thinks of it!

* * *

Things I Also Made:

Inspired by a recent post from the fabulous Alexa, I made this "home made scrapbook paper":

A hand stamped and coloured page border.

This was so simple to do. I cut a sheet of plain white paper to 10" square, then attached it to a sheet of smooth white cardstock, using re-positionable adhesive (note, the "repositionable" adhesive rollers don't always come off cleanly - there are now little sticky bits on my cardstock!! I would recommend the spray adhesive available for craft projects, even though it's more expensive).

I then used an assortment of stamps, with a waterproof black ink pad (like Stazon etc), to stamp a selection of designs around the edge of the paper, letting it overlap onto the scrap paper in the middle. Once it was finished, I peeled away the scrap paper, to leave the stamped border. I didn't worry too much if the stamps overlapped each other, as I wanted the design to fill the edge nicely.

I coloured the stamped outlines with watercolour pencils, then used a small brush and a little water, to blend the colours together. As I coloured, I decided which of any overlapping images would be the "top" picture, then coloured the overlap in those colours, letting the "underneath" image remain just an outline.

Closeup view of a corner.

It really worked very well and I'm so pleased with the result.  Thanks to Alexa for her great tips.  If you haven't been to view her post, I suggest you do - she took this one stage further and hand-doodled on her page as well.  It looked stunning!

* * *

It's my MIL's 70th birthday tomorrow and we're off to her party.  I made her a birthday card:

It's A4 (Letter) sized, the papers are from the "Bella Belleza" collection by Bella Blvd - one of my favourites (I may cry when I finally run out of this paper!). 

I cut the paper to size and left a tab, that I creased and folded round the back of the A4 card that I used as a base.  Once I had finished assembling everything, I stuck the decorated paper to the card and fastened the tab round the back - the card is nice and stable and it looks as if the whole thing is made from this pink scrapbook paper (which wasn't big enough for a whole A4 card, since that would need a piece of card 42cm wide and 30cm high).

  
I used a craft knife to cut round parts of the flowers and butterflies on the patterned paper, then lifted the petals/ wings up and curled them slightly.  I used Stickles to decorate them and give them some sparkle.
  
I attached fabric flowers at the top and bottom corners, using a selection of brads, then added a bit more interest with Stickles.

My DH is happy with this and I think it's rather pretty.  MIL will like it, as she loves butterflies!

* * *

Speaking of Card Making and Crafting, a new UK magazine came out yesterday, from Practical Publishing.  It's called "Simply Homemade" and is aimed at people (women really I suppose!), who like making stuff.


DH has just come home and given me Issue 1, which I'm about to read voraciously from cover to cover!  It looks great and came with a free set of clear stamps, called "Molly Blooms, designed by Clare" - they are so cute! Also there is a great booklet of papers for crafting, on the theme of family and home. The designs are in browns, golden and blues, on a "cross stitch" theme. These also look fab!

There are articles on cooking, knitting, handcrafts, homeware, papercrafts, making things from fabric and felt, soap making, stencilling... There is also going to be a regular feature page, called "Found On...", which will showcase online sellers.  This month's features four shops on Folksy.com (a UK-based online marketing site, similar to Etsy).  They all offer lovely items crafted from fabrics or yarn and I will be hopping over there some time very soon, to see what these shops have to offer.  Next month, they will feature shops from Etsy.  Guess which Blogger You Know Well is having her Etsy Shop featured? Can't guess? You will have to wait til March to find out!  (Here's a clue, I'm very excited about this!).

* * *

And Finally....

DS learned on Wednesday, that not all cats like cuddles:

He always hugs Sherlock when he's going out, but my niece's cat wasn't too happy about this form of "Goodbye".  She swung a paw in panic and her claw caught his right eyelid and the outer corner of his eye (luckily it was no further across!).  He has developed a lovely "shiner"!

Tuesday 22 February 2011

Sold to the Lady in the Wedding Dress! Peacock Wedding Guest Album

I have been working hard on a great project, for an Etsy customer.  A lady called Sylvia contacted me, to ask if I could make a special Wedding Guest Album for her.  Her theme was Peacocks  (in a traditional style, rather than too blingy), with a colour scheme of dark blue, browns and touches of gold/copper colours. 

I sent her a picture of some Peacock paper that I had:

This was a reproduction of a Chinese wallpaper from a National Trust property in the UK. 

Sylvia loved this paper and we came up with a design for her book, using her ideas and mine combined.  She wants her guests to write their messages on some blue luggage-tag style tags that she is making.  She thought it would be lovely to have an album where she could store these after the wedding. 

I sent her a little "Samples Book", to show what she could select from for the pages, covering materials, interleaves, stitching and thread, eyelets on the covers etc.  There were samples of paper and card for pages, covering materials and silk pieces in various "peacock" colours. 

 
After some discussion, we settled on a design with large, stiff card pages, to which she will attach brown kraft paper envelopes, to hold the tags. She wanted an oriental stab-stitch binding, so I included this on the sample book, to show what it would be like, along with a sample of silk bookcloth, that she could have as an edging for the covers. 

She liked the golden linen binding thread and navy silk edging so much, that she decided to have these for the "real" book.  We agreed that the back cover would be brown kraft paper (as she liked the back cover of my sample book - which I only did because I didn't have enough spare cover paper!)  She chose interleaves of a strong, but fine Japanese mulberry tissue and we agreed that there should be an interleaf between the last page and the back cover, as the kraft paper was not guaranteed acid-free/archival quality.  This should provide some protection for anything on the back page, though I think it would take a very long time for any damage to occur.

Work In Progress:

Back Cover - brown kraft paper and blue silk bookcloth

Pages of 300gsm Ocean Blue card; spacers of card and book board, page wraps of peacock paper.
All are cut, creased and punched, ready for assembly and binding.

The front cover, with hinge and decorative navy tussah silk panel. 

The Japanese Stab Stitch binding in progress. 

The finished stab-stitch binding in golden yellow linen.  You can see the section wraps, of peacock paper, to match the front cover.  Each section consists of two card pages, two mulberry tissue interleaves, wrapped round card spacers for strength and a book-board spacer, to allow for the extra bulk of the tags being added to the album. 

Detail of the binding and tussah silk edging. 
The back cover, with silk edging and linen stab-stitch binding.


Views of the inside of the album, showing the covers, the blue card pages and interleaves. 
The finished Peacock Wedding Album!

It measures 12" x 12", with a useable page area inside of 11.75" x 10".  There are 12 pages of 300gsm Canford card, with Japanese Bib-Tengu mulberry tissue interleaves.  The front cover is a peacock design paper, reproduced from a Chinese wallpaper at Erdigg, a UK National Trust property.  The section wraps are of the same peacock design paper.  The binding is a Japanese-style stab-stitch binding, with a hinged, two-part cover, over navy tussah-silk hand-lined bookcloth decorative edges.  

I contacted the customer today, to tell her the book is completed and will be on its way to her very soon. She's really excited about this - and to tell the truth, so am I!

Wednesday 16 February 2011

Meet Bella!

Ladies and Gentlemen, allow me to introduce....

Bella!

Just finished today, she's the Monkey with the Mostest - in terms of cheek and attitude, at any rate! 

She started life as a pair of brown socks, with pink heels and toes.  Her head, body and legs are all one sock... Her nose is the heel part of sock #2 and her arms and loooong tail are also cut from the second sock.

The tail is cut from the whole length of the sock, toe to cuff, using the part that was left after the heel was cut out.  It is stiffened with a long chenille pipe-cleaner and has a little stuffing to give it more shape (boy did that stuffing take me ages - sitting with a long bamboo skewer, using the blunt end to push tiny bits of stuffing doooown that tail!).
That tail is long and bendy, can be twisted into shape and will stay there.  Bella can swing it and swing from it too. 
That tail is going to get Bella into a whole lot of trouble - I can just tell.


I introduced her to the Boys... Bro', as ever, was cool about it, but Mon looks pretty fed up in the photo. I don't think they hit it off very well.  I mean, you've heard of "Boogie in the Barnyard"?  Well, we've had "Dancin' in the Dinin' Room" and "Swingin' in the Sittin' Room", followed, I'm sorry to report, by "Chaos in the Craft Room". 

No-one is impressed (except Bella).  Even Sherlock is not happy - she biffed him in the nose and he sent her to Coventry!  Bella doesn't seem to mind though - she's happy in her skin (or should that be sock? hmm...).  She loves her green hair-bow and kneck-tie; she's happy with her ear-rings and her tail makes her squeal with glee.  She's a Happy Sock Monkey and intends to live life to the full. 

I daresay she'll settle down in a day or two.  The other Sock Pets will see to that - she'll be squashed a few times and that will sober her up a bit!
But you have to admit, she's cute!

Sunday 13 February 2011

Shimelle's Sketch of the Week - The Lizzie Made Version

Inspired by Fay over at Beautifullilly's Ramblings, I had a go at Shimelle's Sketch challenge for this week:

Here is Shimelle's Sketch...

...and this is my version! 

I've had this photo on my desk for ages, meaning to scrap about it.  We went out for a meal together and the Boys were chatting and messing around, I got my camera out and J. & D. just spontaneously posed like this.  But it sums up so much about their relationship as Father and Son.  The love is so obvious - as D. said, it doesn't really need words to explain it!

You should take a look at Fay's and Shimelle's layouts too - they are both really great.  Fay's made me laugh - go and see for yourself!

Oh, oh! Forgot a list of materials used (in case anyone's interested!):

Bazzill Kraft cardstock (for the base), brown collage-style paper by Dream Street Papers, Red and White spotted paper by Cosmo Cricket, Houndstooth check paper by October Afternoon, green paper strips by Basic Grey.  The small paper strips on the right are the reverse of the October Afternoon and Cosmo papers.
Metal embellishments and letters all by Papermania, as are the "scrabble tile" letters. Green letter stickers by Basic Grey.  Black chipboard circles are Thickers by American Crafts. Small script word stickers by MLS.  Mulberry paper hearts & cork heart from my stash. Punched hearts & flower made by me.

There I think that covers it! :-)

Friday 11 February 2011

Nearly Spring?

Note there are a couple of short videos at the bottom of this post, which seem to load a bit slowly. I suggest you scroll down to the first and set it loading, then read the first bit of text while you wait!

* * *

We're having a spell of mild weather; earlier in the week there were high winds and it was still pretty chilly, but for the past two or three days, we've had much milder weather and even sunshine on Tuesday (it rained all day yesterday). 

This morning I was in the kitchen, making breakfast/lunches etc.  Sherlock asked to go outside - he's been enjoying the weather also and spending chunks of time outside in the garden.  I opened the door to let him out and this is what was outside:


The sun was coming up behind our neighbours' houses, there was dew on the grass instead of frost, the border was filled with snowdrops and even an early iris.

Sherlock went scouting around the garden, enjoying the mild weather and hunting for mice!

 
The birds were singing and hopping around, having their breakfasts (you can hear a robin, chaffinches, blue tits, blackbird, starlings and even a collared dove cooing somewhere outside the garden).  If you'd like more information about British garden birds  follow the link!


This is our Robin, giving us his own little concert.  It sounds so lovely that I have included it despite the odd picture. (I'm sorry this is sideways - I forgot that I don't have any software that will edit videos and I turned my camera to "portrait"!)

Perhaps it will be cold and windy again tomorrow, or raining this afternoon, but it's mornings like this that remind me what I like about living in Eastern England! 

Monday 7 February 2011

I Won a Prize!

Hello All,

I wasn't going to post anything for a couple more days, as I still have a yukky cold (which isn't really very newsworthy!). On the mend though, after a lazy weekend (with no housework done for days, I feel a bit guilty, but it will have to wait until I don't get wheezy and dizzy from doing no more than loading the dishwasher!).

But I have been blog-hopping this evening and found that the awesome Megan and Jake at Nerd Nest have given me a prize! 


How exciting is this?  And yes, it is the same Nerd Nest who awarded me a great prize in a giveaway they had last spring.

* * * * Thanks Guys - You're wonderful. * * * *


(If you follow all the links here, you'll have a mini-adventure all for yourself!):-

If you have never visited the Nerd Nest blog, I would really recommend it.  Jake and Megan are a great couple, who have a gorgeous little girl and a new baby boy.   They write about all sorts of interesting things, such as their lovely thrift shop treasure finds, their home (was a great loft apartment, now a lovely new house!), fun music lists (Music Mondays), favourite movies, eclectic little bits & pieces, recipes, craft projects, books, as well as family news and adventures.  There is so much fabulousness squished into such a small space on their blog - they're definitely one of my favourites!

And for anyone who has visited recently and couldn't get their comments box to work - it has been fixed in typical Nerd Nest fashion!

Friday 4 February 2011

Peter Pan, Pirates and “Reel” Treasure!

Today I am at home, resting and nursing a rather pesky cold, which sprang up overnight – I don’t want it to become a chest infection!

But yesterday (when I still felt fine!), I had a lovely day out.   My niece, Keri-Anne was able to get tickets for us to see Peter Pan on Ice at the theatre in Northampton:
Some highlights from You Tube of the show we saw.
 
The whole stage had been turned into a temporary ice rink. And it wasn’t that plastic stuff they use for kiddy ice-rinks in the local shopping centre, but real, proper, very cold ICE! 

We were able to go backstage after the performance (Keri-Anne’s husband works in the theatre – yippee!) and saw the huge ice-covered, glycol-filled pipes connected to the cooling equipment.  Apparently someone has to be on duty all night, to keep the ice cold and make sure it doesn’t melt (which means that theatre staff have to be there all night also, to support/supervise the touring company’s staff while they are in the building).

Anyway, we had a fantastic time. It was a really wonderful, professional and beautifully presented show.  The ice-dancers were athletic and skillful – they were obviously so well rehearsed, not a hitch, nor a slip-up all through the gruelling 1 3/4 hour show.  The costumes were so well designed and made – they looked flimsy and light, but could stand up to the punishment they would take from all that leaping, spinning, skating around, being lifted in the air etc. 

The show was like an ice ballet – no speaking or singing – but there were a few sections of pre-recorded narration, which were played to fill you in on what was going to happen in the next scene etc.
It really was a fabulous show and the whole Company – and support staff at the Theatre – should be congratulated.  It was worthy of big London theatres, not just provincial large-town theatres like Northampton. 

I am so glad I was able to go – thank you Gilles for organising it for us!

* * *

I went over to Northampton early yesterday; my friend gave me some lovely curtains for Keri-Anne, that her own daughter had grown out of (having reached the grand age of 10, she doesn’t want pink with flowers and fairies any more – she has exchanged these for hot pink and orange curtains, with little Japanese ladies on them). 

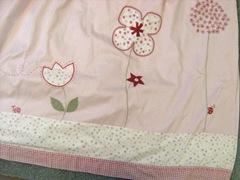
Elle has inherited these beautiful curtains for her bedroom:
Curtains_for_Elle_1
However they are about 20” / 50 cm too short, as their house is Victorian, with tall windows.  As they are made in a layered design, with the strips of floral and dark pink gingham at the bottom, we thought it would be very simple to lengthen them by adding a 50cm strip of pink gingham, from her previous bedroom curtains.

So, I went over to help Keri-Anne, as she has never made or altered curtains before.   Problem – when they got the bag out of storage, the curtains were damaged and had to be thrown away.  We went to the Market, looking for suitable curtain fabric, but sadly there was only one fabric stall yesterday, with a very limited selection.  No other places in Northampton sell fabrics – imagine!  I have promised to go into Bedford next week and find something suitable.

Meanwhile, we went for a little wander, to find a wonderful shop that Keri-Anne had discovered.  It’s called “A Most Marvellous Place to Shop”;

And it really is marvellous! They have a huge space, which is split into little nooks and crannies, which are let as small units to individual sellers. However, the shop has a general theme of Vintage items – which range from C19th right through to 1960’s –1980’s stuff. 

We found lovely things, that we would like to buy – but price and/or size were a problem. Some items were a bit over-priced to be honest, but much of it was good quality stuff, in excellent condition and at realistic prices. 

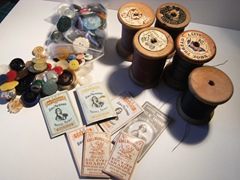
This is the Treasure that I bought:
040211_Real_Treasure 
040211_Real_Treasure_Buttons  040211_Real_Treasure_Reels
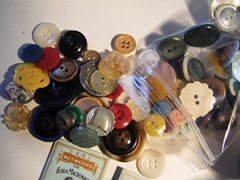
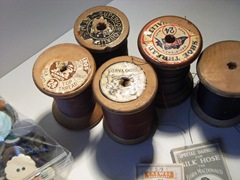
A large pack of genuinely Vintage buttons (rather than the copies you can buy just now); five huge reels of sewing threads – which I think are cotton - with a “satin finish”, which I think must mean they are mercerised, as they certainly are shiny;
040211_Real_Treasure_Needles  040211_Real_Treasure_Needles_2
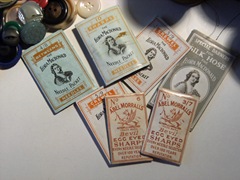
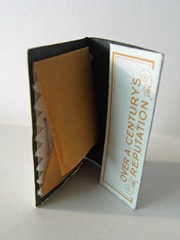
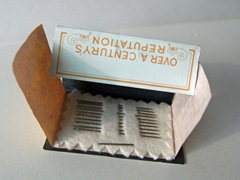
Seven little packets of needles – a good variety of types. There are Sharps, Betweens and Crewel sewing needles, then a packet of repair needles for silk stockings (that certainly dates them!) and two packs of “Egg Eyed Sharps”, which I think are just a brand gimmick, since they look much the same as any other type of Sharps to me!  

They are beautifully packaged, in paper wrappings, with a black, protective coating inside.
040211_Real_Treasure_Needles_3  040211_Real_Treasure_Needles_4
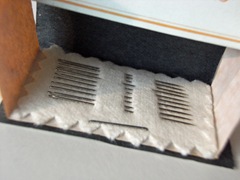
There is a layer of waxed brown paper, then the needles are pushed into a piece of soft fabric;

All of them are still as shiny and sharp as the day they left their factory – which must be a good 50-60 years ago!

Wonderful Treasure indeed!

So, you can guess where I may be wasting more hours in the future… good thing it is a 20 mile drive away, or I might be there far more often than is good for me (or the bank balance!).

I did have a lovely day – thanks to Keri-Anne and her lovely husband.  Thanks very much, you too! X

LinkWithin

Related Posts Plugin for WordPress, Blogger...