This is my contribution to Sian's monthly story event:
Storytelling Sunday. Visit her blog, to find more wonderful, interesting, fascinating and amazingly varied stories - there will be enough to keep you going all month!
This summer was one of the most crazy and busy I've ever had. I spent my time scrambling about, between a number of activities. Family life was a bit haphazard, I'm afraid - though I managed a week at the seaside and a couple of nice days out with James too.
I had a week's teaching, for the local Childrens' University. Two (or more) of the previous weeks were spent in planning, writing and preparing materials and notes for the one-week course. Then I spent a week teaching.
While we were on holiday, my mother was taken ill. On the day we returned, she was admitted to hospital, with a suspected stroke - which, unfortunately turned out to be the cause of her illness.
I spent the rest of the summer caring for her.
Somehow, in between the madness, I did manage to make books. In fact, between July and September, I made quite a few.
So, I thought I would make a little Gallery, to show you a quick glimpse of my work.
Lizzie's Summer Book Collection
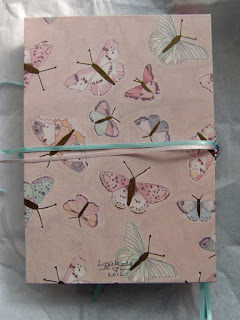
A Pink Butterfly Recipe Book
I made this as a birthday gift for my niece. The covers are a paper I have had for a while - it matches a butterfly box, that Keri-Anne has in her kitchen, to store stuff for her baking. I decided ages ago, that I'd make her a recipe book to match - finally I did!
It wasn't actually ready in time for her birthday, but I was able to take it with us on holiday, as a nice gift when we arrived. It's designed for her to keep her favourite recipes in.
There are lovely plain white pages, in sections, with a concertina spine, made of white linen, lined with handmade paper, which gave it a lovely stiffness.
The binding is done in a soft pink linen thread, using a variation of the Longstitch binding, called "French Stitch". I threaded beads onto the central stitch of the spine, to make a pattern, then a pink and a blue ribbon, so it could be tied at the front.
The butterfly on the front cover is attached with stitching, so it holds the ribbon in place, but allows it to slide, so the book can expand.
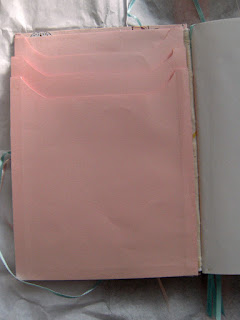
Inside the cover is a set of little pockets, so she can tuck clippings and notes inside and I included several blue ribbon book-marks, to keep her favourite pages handy.
She was very pleased with it - I hope she enjoys using it!
A Pair of A4 Recipe Books
Sami asked if I could make her a pair of books, in which she could write all her favourite family recipes. They were to be the same, but with differences - one was for each of her little daughters, to have when she is bigger. I think it's a lovely idea!
She chose two different papers, from the scrapbooking range by Chatterbox. We spent a lot of time on the design, discussing colours, ideas for the book structure, spine details etc. The books kind of evolved as we went along - the whole process took a few months overall, slotted in between various wedding book commissions - Sami wasn't in a rush and wanted the books to be just right (so did I). I am so glad to have had such a patient and enthusiastic customer - it is lovely when this happens, as it gives me the chance to be creative and experimental.
I decided in the end, to use the fabric concertinas for the spines - one blue, one yellow, to mirror the colours of the papers.
I chose green hemp for the bindings and some little buttons from the same range of products, for decorating the covers.
There are concertina pockets inside the front covers - if you look closely at the spines, you will notice there's no stitching at the front of each spine; this allows the folders to open out. The ribbons wrap right round, to keep it all closed and tidy, but they will also allow the whole book to expand. Sami can stick stuff on the pages, put clippings in the pockets and they shouldn't go out of shape.
As with the little pink, A5 book I made for Keri-Anne, I used a French-stitch style of Longstitch for the binding. It's pretty, but also strong and solid.
The covers each have a label, saying "Mum's Cookbook", mounted on matching card and scraps of paper to match the back covers.
Sami was very pleased with her books - and so was I! It was great to ship them off to her at the beginning of August.
Linen and Silk Wedding Guest Book

Melissa ordered a large guest book, as a gift from herself, to some special friends who were getting married. She was very specific, that she wanted two sections - one for the Guestbook, the remainder to hold Wedding Photographs.
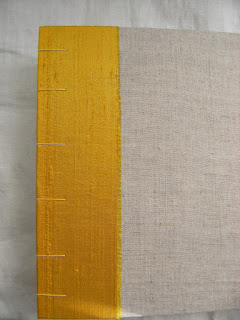
She liked the "burlap" look of the unbleached, natural linen, so this was combined with a lovely bright golden-yellow silk, to make very smart covers.
We decided to use a neutral art paper, to line the covers and make dividing pages for the Guestbook and Photograph sections.
The paper inside was the same type (Fabriano artists paper), but the weight of the guestbook paper was much lighter than that in the photo album. The guestbook contained six printed pages (12 sides), with boxes for the guests to write their names and messages.
There were 24 pages in the photo album, designed to have photos attached on both sides. As it was so heavy, I cut the paper for the photo pages as single sheets, which had a folded spacer. Thin sheets of glassine paper were then attached to the spacer, with a pretty decorative edge on the spacer section. The glassine would prevent photos sticking together, if placed face-to-face.
The whole book was bound with a Coptic stitch. This would allow it to open out flat all the way through - very important with so many pages.
I attached a printed Colophon to the inside of the back cover, mentioning that the book had been specially commissioned by Melissa and giving full details of the materials and construction used to create the book.
The end result was very attractive - elegant and understated, but smart and very useable. I do hope Melissa's friends were as pleased with it as we were!
Linen and Silk Wedding Guest Book
Another customer who wanted the lovely neutral linen for her guest book, was Tori. She and her fiance were having a wedding themed around the neutral colours he wore for his hobby - hunting - and also terracotta/tangerine and aqua-turquoise. She was also looking for something elegant and simple-looking, so chose this style of book.
The covers were of linen and a terracotta silk, with a fringed edge detail.
The book was filled with hand-cut creamy-white paper, with wrap-round spacers, cut from a marled aqua art paper, to match the linings of the covers. I used a lovely hearts edge punch, to make a decorative detail on the spacers.
As there were quite a lot of pages, we decided on a coptic style binding, in a terracotta waxed linen, to match the silk on the covers.
It was lovely to have an excited and enthusiastic response from my customer, when her book arrived!
Extra Large Wedding Photograph Album, with Birds and Butterflies
Another commission that was to be given as a present. The customer originally placed the order at the very end of July, for a Guestbook to be made and sent to Austria, within just a few days. I had to explain that this was just not possible, as my order book was very full and I also had other commitments (my teaching and my holiday!). She was happy with my suggestion that we should turn it into a Photograph Album, for her friends to use after their wedding.
The book was very large - about 13.5" x 10" - with 30 pages of heavy-weight artists paper. This is about the thickest I can make an album of this sort, as it had a Japanese-style stab stitch binding, with hinged covers. The covers will fold back on themselves, totally flat, but the pages, being thick and heavy, do not open very flat.
I solve some of the issue, by making crease-lines on each page, staggering these creases, so that the ones on the first pages are much closer to the binding than those further on. It just helps the pages to turn in the right place, so there is less chance of them crumpling at the bound edge and they will hopefully turn more easily and sit a bit flatter on top of each other.
However, the binding is very attractive, so it's quite popular. Luckily this is a photo album, rather than a guest book - I think it's harder to use a guest book, if you have to hold the book open with one hand, while writing with the other (or get another person to hold the book for you - especially if you are left-handed).
The customer chose a red lining paper for the covers, with a matching red linen binding. She also requested a customised label, to be attached to the first page, with the bride and grooms' details and a little message/ quotation. I cut the double mount from paper to match the covers, with one of the butterflies cut out and attached to the top corner.
There is a colophon inside the back cover, giving details of the book's design and construction. I printed it onto vellum paper, as it shows the cover lining paper and looks smart. I started including a printed colophon inside my larger books, this summer, as it gives the owner a lasting record of their purchase or gift.
Other Books
In between the various Commissions etc, I have made a number of other books too.
During August I finished these two smaller Guest Books for my shop. They both have covers of Liberty Print Tana Lawn and silk - my favourite fabrics for book covers!
Rainbows
I then did a bit of experimenting with rainbows - some little notebooks, which look very innocent on the outside, but have a rainbow of pages within!
Another rainbow surprise - a larger journal, with wrap-over cover of black leather and mulberry suede. The leather is a lovely weight - not too stiff, but nice and firm all the same. The suede is lighter weight, but has a soft, velvety feel.
I used two layers of this - one with the back outermost, the other with the front facing outwards, to give a two-tone effect to the decorative edge of the cover, also a lovely soft lining to the inside of the journal. It turned out beautifully!
But inside, the journal is a riot of rainbow colour, with ten different shades of paper, arranged by colour, in a "rainbow" order. I wasn't sure if it would work (especially as there is scarlet red first, which does clash with the mulberry suede), but it looks great!
Notebooks

I've been experimenting with some little 6" x 4" pocket notebooks.
They have covers of kraft card, with decorative paper attached. Inside are 40 pages of cream text paper, with hand-trimmed edges. They are stitched along the length of the spine, with black linen.
Each book is presented in a matching kraft paper envelope.
They're good fun and the first of the bicycles books (there were three), has already arrived in America, bought by my blog friend, Megan!
Hand Embroidered and Appliqued Journals
"The Lake" and "Harvest" Hand-embroidered Felt and Suede Artist Journals
I have had a lovely time, creating a collection of "Artists Journals".
The covers are made from soft, wool felt, in lovely marled-effect autumnal colours. Each is lined with that gorgeous, butter-soft suede that I have in my stock - blue-grey, dark grey, or deep red (inside the orange one).
I embellished each book with pieces of fabrics, silks, suede and leather. They are hand-embroidered with coloured silk or metallic threads. I used semi-precious stone beads to enhance their covers, with a metallic button fastening and metal beads on the spine.
They contain handmade cotton-rag paper, which is hand-torn, to keep the lovely deckled edge effect. I used a longstitch binding, in linen thread.
These I am very proud of! I have sold the blue-grey "Lake" and orange "Harvest" journals, but I still have "The Forest" (green) and "Misty Morning" (yellow-grey).
I am still busy making! Today I cut, folded and prepared enough sets of pages for seven more 6" x 4" journals - or maybe some more leather ones. I completed three more notebooks this evening.
I also have a second leather and suede covered journal, with cream pages, on my binding table. It will be ready early in the week and I hope to post it in my shop soon.
* * *
Thank you if you have read all this!
This wasn't quite a "Story" in the old-fashioned sense, but it tells a story of the work I have managed to fit into the spaces between my everyday Real Life.
I am really quite surprised actually, now I have collected everything together, by how much work I have completed over the past three months. Considering that August was almost entirely filled by my holiday, preparation and teaching of the Children's Uni course, plus caring for my mum... and September was very disrupted by "mummy-sitting" too... I think I have achieved loads - I'm rather proud of myself!
Anyway, I hope you enjoyed seeing the stuff I've been doing. I have been rather quiet on my blog in the last few months, except for the recent burst of posts about the Bloggers' Weekend we have planned for March 2013.


