Monday 31 May 2010

More Makes (and a few bits of waffle)

This weekend we were celebrating my upcoming birthday.  I will be Thirty-Something-and-a-big-bit... (not telling, laa, laa, laaaaa!).  We went out on Saturday night, to a lovely Indian restaurant in town and ate lots of yummy food. On Sunday morning I had my birthday cards from J. and D. and a present from D. as well.  He'll be working on my birthday, so Sunday was my "Official Birthday".  We also had my mum over for a nice lunch. It was a good weekend.

I was also busy this week, working on a few projects. Another birthday card:

This was for my friend Mary, whose birthday is today.


...and this book, for Kylie, whose birthday was a couple of days ago. The photo was taken in artificial light, so the colours are a bit ropey. It's a brighter green and yellow than in the photo. 

This book is a journal, with 40 pages (80 sides) of plain sketch paper.  They are in 4 sections, with green mulberry tissue guards at the spine. The binding has a hinge in the cover, to allow the book to open. It's covered with bright lime-green Khadi lotka paper, with an orange-gold silk tussore at the spine edge.  The binding is with a lime green cord, through the eyelets you see on the cover. This passes through all the pages.  I made the little tassel out of the tussore silk.   The back cover is the same as the front, without the extra embellishments.

I embellished the front with a hand-printed image, from one of my hand-carved stamps, printed on Zircal printmaking paper with bright green water-based ink.  I used a piece of the silk fabric as a matt.


Kylie came for lunch today and we had a nice afternoon, eating chicken and baked potato, ice-cream and fruit, then gossiping over cups of tea. 

She was very pleased with her book and has asked me to make her a special diary-planner, that she can use at work. I am very pleased to have another commission! I have to cost it up and let her know the price, but I don't think it's a problem.  I'm looking forward to making this, once I finish the Wedding Guest book that I'm working on for an Etsy customer.


Thursday 27 May 2010

Sold! to the Gentleman from Hampstead!

Well first I must draw your attention to this post from FurryLittleMonster, which is just sooo funny! It made me laugh and woke me up on a sleepy Thursday morning.

Then I have news of a second sale this week (or third if you count it per item!).


Who could resist that little face?

So the Sock Puppy is off to a new home. I'll miss his cheeky face, peeping at me over the top of the storage box.  Time I finished and posted another one in the shop!

It's been so busy this week (see previous post for some details!).  In fact, after a busy weekend and three equally busy days, up to this morning, my body finally decided to mount a protest. I went to yoga this morning (after walking Tuesday and Wednesday mornings and running about all day Wednesday). 

My body did not want to co-operated, even though it's a very gentle session. I couldn't get into a relaxed frame of mind or body and found myself having to go and use my asthma inhaler, as everything went into mini-asthma-attack mode.

I recovered quickly enough, but took it easy (easier, as I hadn't exactly been pushing myself - we hadn't even sat up yet!).  I'm off to bed in a minute, as I feel like I could sleep for a week!

Obviously a quiet day would be a good plan for tomorrow. I have to take my mum to her appointment with the nurse, but otherwise, I will stay at home and relax. A good day to work on a couple of book projects, a few birthday cards, my "Project" mini-book etc. Oh, and another puppy or two for the shop!

I hope everyone has had a good week so far. I've had so little time for blogging, that I'm really a bit behind on some folks' news. I apologise and will catch up soon - I promise!

Best Wishes to all Blog Friends! Normal LizzieMade Service will be resumed asap!

X

Tuesday 25 May 2010

A Waffly, Catching-Up sort of Post...

Well, the last few days have been so busy... I hardly know if I'm on my head or heels, but I've been having a lovely time!  

Friday DH and I went to Milton Keynes, which is about 20 miles from here, to search for some essential supplies for a book commission that I need to start. I needed moss-green silk, but couldn't find any locally. Also wanted some papers and possibly some ivory silk too.  Found the silk, along with some lovely linen/cotton mix fabrics, which will make lovely Summer-time books (if I only get on with it!).  Limited luck with the papers though. Luckily I had an order through from Shepherd-Falkiners' in London, which had some of what I need, so I'm hoping I can get started on the Wedding Guest Book this week, once I get confirmation of the fabric and paper choices from the customer. 
Green Silk Dupion and Natural Linen Mix;  Ivory Silk Satin and Natural Linen Mix
  
Ivory Silk Dupion;  Handmade Mulberry Paper with Large Mulberry Leaves

We also had a lovely lunch out, at "Bella Italia". I am rather keen on Italian risottos, so I was pleased to see a butternut squash risotto on the lunch menu. A plateful of this, with a glass of San Pellegrino Limonade and I was happy for the rest of the day.

Saturday was all jobs, as usual. I managed to get through 6 loads of laundry and some housework, as well as ferrying the Boy to his Saturday club in the morning.  He earned extra pocket money by helping with the laundry and vacuuming the downstairs rooms for me.  That certainly was appreciated, as hoovering gives me a backache still.  DH had a rotten cold and went to bed for a good rest, so me and DS had a quiet afternoon (in between hanging out and fetching in our loads of clean clothes!).  We all had a lazy pizza tea, as we were tired and no-one felt like cooking - it was a warm day as well... zzzz

Sunday was the hottest day so far this year. It got really warm by 11am and my two nieces came over, with the babies.  We had planned a picnic by the river, but it was really too hot, so we sat in the shade, in the garden and enjoyed our picnic there instead.  Later we had a short walk to the riverside, where Keri-Anne took some photos and we all messed about, but it was so hot we soon headed home again for a drink and a rest.  By 5:30pm we were all worn out. Keri-Anne's husband came to fetch the girls and babies, who were all desperate for bed-time! We had a "left-overs" dinner, from the freezer and all crashed out for the evening. Everyone had an early night on Sunday and slept like logs!


Me, DH and C. by the river (with baby in pram, boy & baby Elle somewhere and Keri-Anne on the other side of the camera!).

Monday was "jobs day" for me, as usual.  I have moved the shopping delivery forward to 8-9am, which meant that it arrived nice and early (7:45 actually, but who minds 15 mins in the right direction?). I had the time to get my home jobs finished, then went and did Mum's jobs too (take her shopping over, collect her pension from the P.O., pick up her prescription from the dr., collect the eggs from the lady who keeps hens, post letters, hang out washing, make sure she's okay before I go away again....). Luckily all was well and I got home by 12pm.  I spent the afternoon working on a lovely book, which I have made for a friend's birthday present (can't show you until she has opened her present, so I'll post it at the end of next week!). 

Today was another busy day. My friend D. called for me at 8:45, once our kids were at school. We have both started walking for our health, but her walks are much brisker and a lot further than mine just now.  So, she did her circuit of the village at her own speed, then called for me and kept me company while I did my somewhat shorter circuit - round the corner, around the big, grassy playground, then home again. It took ten minutes, but I went further today than I have done up til now and I felt okay when I stopped - which is progress, as I was quite dizzy last Tuesday when J. came with me for my first walk!  We will do this again tomorrow and plan to walk together on Tuesday, Wednesday and Friday (on Monday and Thursday I will go to Yoga class).

This afternoon, I finished the Birthday Present, then made these:


The two little girl pictures and the patterned background papers are all by Kirsty Wiseman, from her first two CD's of printables - available Here in her Shop - do take a look, they are all fabulous and great value, as you can print the papers and various little images as often as you want.  The papers all print a bit smaller than A4 size, but they are great for card making and useful for scrapping too. 

I also made a number of books last year, covered with Kirsty Wiseman papers!


So, all in all, it's been a bit crazy round here! I think I need a holiday... Busy day again tomorrow though - two appointments (optician and osteopath) and I need to find time for some housework too!

Thursday 20 May 2010

Twice as Happy!

I love logging into my Etsy shop, to find a message that I have sold an item:

Pink Gingham Fabric Flower set, sold today!

But what makes me twice as happy, is when I find I have sold Two!

Papermania "Rose Garden" Paper Flower and Bunting Set, also sold today!!

Happy, happy!

Wednesday 19 May 2010

Ten Questions from Jo

So, Jo-Jo has set a challenge to five of her Blog Friends - and I'm one of them.  We have to answer ten questions about ourselves, then think of ten new questions and pass it on to five other poor victims!

So I'll have a go...

Favourite quote or poem.
Hmm.. tricky already... my very favourite poem is Croft, by Stevie Smith:

Croft
Aloft,
In the loft
Sits Croft
He is soft

To my mind, that says it all (although Smith had far more to say, some equally "silly", some quite serious, some rather verging on the mawkish, some even rather depressing... ). Still, I like her poems (among others) and this is my very favourite.

How much do you spend on average on scrapbooking supplies in a month?
Well, until recently, it was probably around £20.  However, since I joined in with the "Something from (almost) Nothing" course, from the fantastic Shimelle, I have been trying not to buy any scrapping supplies and use what I already have (or should I say "hoard"?).

But, of course that doesn't apply to bookbinding supplies - I probably have spent my £20 on those instead, especially as I'm currently awaiting the delivery of an order of paper!

Blogspot or typepad?
Blogspot. I also did the "Blogging for Scrapbookers" course with Shimelle. She produced a great starter booklet for those of us who didn't already have a blog. I chose Blogspot and I'm quite happy with it just now.

If you could choose one thing which would make you happy what would it be?
Spending time with my husband and son. My family are the thing that matters to me most in the whole world (even more than bookbinding and scrapbooking!)

If you could save one thing from a house fire what would you save (family, children and pets are already safe)?
Probably my PC, as it contains all our family photos (which I really must back up....). And my scrap albums (am I allowed those too?), or my box of finished books, which represent hours of hard work and enjoyment... Do I have to make a choice?

What would be your ideal holiday destination and why?
We go every year, to Wells-Next-the-Sea, in Norfolk.  The beach there is the most wonderful place. It is long, wide and empty, with sea rolling in and out, dunes and pine woods. I love it there and miss it so much when we leave. I need to go there at least once a year, for my "Fix"!


If you were an author what genre would you write in?
I write in all kinds of styles and genres. I suppose my favourite is fiction of a semi-romantic style, that would probably appeal most to women.  And of course I write in "Craft Blog" genre too!

Have you ever stolen anything?
Do you mean other than the occasional sweetie from my son's stash?  Not really - I almost stole some sweets from the newsagents' when I was about 8 or so. But I decided it was not a good idea and gave them to the newsagent, saying "they fell in my pocket". Of course he knew what was going on and I got a good telling off - but he was less cross because I had given them back. My mother said the same, but I felt awful. I never fancied stealing after that - besides which, we were taught very firmly at home that it was wrong.

What is your best dish when entertaining?
Ummm... these days I tend to produce some kind of stew/ragu/bolognese type of meal, with meat or chicken, all in one big pot, served with rice, pasta or baked potatoes and nice bread & salad.  Those are always popular and they're quick and tasty. I have given up trying to impress with fancy stuff - it's too time consuming, doesn't impress people nearly as much as a nice, yummy stew and makes me hot, tired and cross! If it's presented nicely, a well-made ragu, with tasty, fresh ingredients is a great meal to serve to guests.

Describe yourself in 5 words
Happy, kind, loving, friendly, disorganised (or you could substitute "modest" for the last one lol!).
Sometimes you'd need to add the word "stressy" to this list, but there's a lot to be said for a loving family and nice little home - it brings out the best in most people!

* * *
So, that's Part One finished with - phew!  Of course, I now have to think of ten more questions that are, more or less, original.  Then I have to saddle five other poor victims with the responsibility of answering them!  Hopefully they will forgive me, take it in good part and produce some interesting answers that help us to know them better!

My Ten Questions (chosen rather at random, as befits a sunshiney Wednesday afternoon!)

Where would you most like to live, in the Whole World?

Pooh Bear or Snoopy for Prime Minister / President and why?

What is your favourite thing to eat?

What was the worst thing that ever happened to you at school?

What was your favourite school subject and have you continuted it in your career/job/life after leaving school?

Did you become what you always wanted to be when you grew up?

What Was your Grandad's shoe size?

Who is your favourite Author and which of their books do you enjoy most?

Post a photo of your favourite ever craft project (done by yourself!) - a scrap page, card, book, painting, crochet item etc etc... Why were you so pleased with it?

Do you have a favourite Blog site, that you go to every time you sign on to your blog? (and no, I'm not angling for compliments and mentions, I would just like to know your real favourite!)

* * *

So that's the end of Part Two! Now I have to nominate five unfortunate blog friends, to join in with the challenge. I hope they will be happy to have a go and will forgive me!!

I have chosen Jo-Jo (back at you lol!!), Amy from Aus,  the lovely MayaSue in Dubai and lastly (but not least-lee - ha, ha!!) Lee from the USA - a truly international selection!

Sunday 16 May 2010

Still Stamping!

So I now have the Stamp-making bug!

Having made myself a butterfly stamp, from a lovely soft "lino" disc, I have been playing with more designs.

 
Here's my design for a little house -something traditional in style, like a lot of the houses I see in Bedforshire all the time.

I started to carve it like this.

and this is what it looked like at first.

Then I carved away the edges, to make the house stand out on its own.

My finished House! A nice clear little stamp. I like it.

I also designed a little cottage stamp. It will be lovely for "New Home" cards.

This is the first test print I made. Very flat. Rather uninspiring really.

Carved out the "garden". It looks like a snow-scene. Hmm...

So I carved away at the sky too.

This print was made with the stamp fixed to an acrylic block. I patted on the inkpad and stamped it onto the paper.

This print was made by putting the paper over the print block, using the ink left over from the previous print. I then pressed it down with my fingertips, in a circular motion. (apologies for something showing through from the back - the test paper is rather thin). 

The pressed image is rather soft, as I used "left-over" ink that was on the stamp from the previous print. Still, I do like it. I will try a few more, with some coloured inks and coloured papers, to see if I prefer to "stamp" it or "press" it. I do like the textured effects you can achieve with lino-cut printing. It's one of the qualities of hand-printed images that I have always loved. I had such fun making this little stamp.


I decided to try a slightly more complex design. Some beach huts.

I transferred the image to the lino plate.

I carved some of the lines out, and some of the "spaces in between". This time I wanted to see what it would be like to have a plate/stamp that was flat, with the image entirely made from the cut-away pieces (rather than some of it in relief).

I'm pretty pleased with the result of this test print, though I need to work on the printing itself.

I also need to put in more work on the line thickness etc.  As Louise pointed out yesterday, you can achieve thinner and thicker lines, by varying the pressure of your cutting blades.  I haven't got that lightness of touch yet and my lines are all much the same thickness.  While I wanted this effect for the beach huts, I would have liked to achieve finer lines for the sand dunes, sand ripples and seagulls.

Time to make more stamps - practice makes perfect!


Friday 14 May 2010

Stamp, Stamp, Stamp...

I found some of these in the Art Centre a couple of weeks ago:

They are blank circles of lino-cutting material, with a sticky back.  They're designed for use with a (rather expensive) lino-cutting and stamp-making system.  The blanks themselves are quite cheap though - £1.99 for a pack of 10 - Bargain!

So, I bought some, because at home I already had these:

Yes, a lino-cutting set.

I haven't done any lino-cut printing for years and years (since I was a teenager!).  However, after my printmaking course in January, I really wanted to get back into printmaking at some point. 

Lino prints are relatively cheap and easy to make. Unlike many printing plates, lino-cuts can be printed using manual methods, rather than you having to have a press. Obviously a press makes it easier and gives more scope, but you can use a flat hand, a spoon-back or some other pressing tools to transfer your image, so long as it's not too complex.

So, I had bought some more lino-cutting tools and a couple of bits of that hard, grey lino.  And done nothing. Too busy doing lots of other things instead...

But yesterday I really fancied having a go.  And there were those great little discs, just waiting to be tried out.
I have been wanting a Butterfly stamp for a while now (who doesn't like butterflies?). 

So, I made one:

I drew round the lino disc, then drew a design with a soft pencil.

I placed the design over the disc and rubbed a faint pencil impression onto it, then drew over that with a permanent fibre-tipped pen.  I cut the design out of the lino disc. It was much easier than the "grey lino" I am used to, as this stuff is lovely and soft. You have to soak the old-style lino in hot water, to soften it up, but this is just great - all ready to use and it's like cutting through cold butter.

Then I stuck the disc to a milk-bottle top, as a handle.

This is what the stamp looks like... I love the lino-cutty texture of it.  I could make it all smooth between the butterflies, but somehow I prefer it like this. The prints produced will have that "lino-cut print look", which I really like.

and here are some test prints.


This was the original test print, before I added extra marks to the butterflies.

The stamp was mounted on a large acrylic block for this print.  I think it gave a clearer, crisper print, so I may try this - or another more solid handle - next time, instead of the milk-bottle lid (which is hollow).

I really enjoyed making my stamp and have plans for some more soon! Another, different butterfly, perhaps a tree... hmm, thinking of ideas myself - do you have any good ones for me to try?

Oh, and if anyone knows where I can buy some fine-detail carving tools, I'd love to know!

Sunday 9 May 2010

Paper Flower Tutorial Part 2 - Flowers from Paper Strips

Hello again!

This is the second part of my Paper Flower Tutorial - see Part One here.  The flowers here are simple to make, from strips of paper.

They're great for using up those little bits you end up with sometimes, after cutting mats for photos, or bits of paper for your scrapping projects. Have a go at these, then see if you can come up with some variations of your own!

By the way, someone mentioned the papers I used, for the last Tutorial and I realised I hadn't said what they were.  The paper for these flowers is the same too - it's the "Rose Garden" range, by Papermania.  (These flowers are made from the 8" x 8" Paper Pack).

Paper Flowers from Strips of paper


Equipment Needed

As with the Circle flowers, you will need a ruler, craft knife and probably a pencil, for marking measurements (unless you're like me, and do it by the "that looks about right" method!). You will also find some paper punches handy, for cutting circles and also fancy edges for your paper strips.

Materials Needed

An assortment of pieces of paper. Waste strips from other papercrafting, bits of spare scrapbooking papers, pieces of art paper or matting blocks, even thicker sheets of gift-wrap can be used. Patterned paper is nicest, but plain can also make very pretty flowers.

Preparation

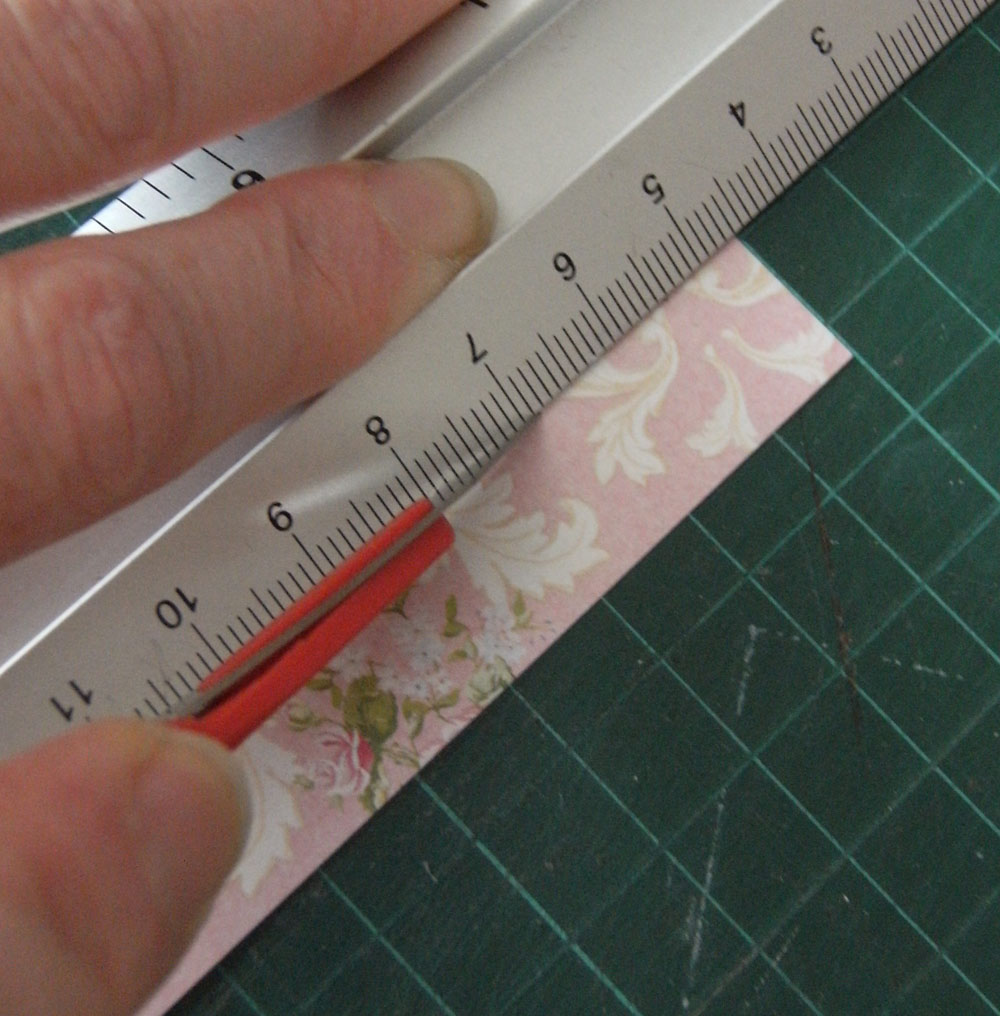
Cut your papers into strips, between 1cm/ 3/8" and 1.5 cm/ 1/2" is best.

Cut the strips into suitable lengths for your flowers - around 9cm/ 3 1/2" is good for a basic flower, using 1.5cm/ 1/2" wide strips.  Cut the thinner strips shorter (but wait a bit to see what I suggest for these!).

The flowers look really nice if you have shaped the ends of the strips. Here I've used an edging punch to cut curved ends.

Or push the end of the strip through from the inside of a scallop punch (as shown), to make a pretty frilled edge. This is specially nice on the thinner strips, as it gives a single curve, with little corners.  Be careful to line up the end as you would like the pattern to be.

Or use a corner punch to round the corners of the strip, making a "lolly-stick" effect.


Or line up the ends of your strips, then cut a "V" shape into all of them at once.  This looks especially nice on thicker strips. 

* * *
Keep those little triangles - they make fab mini-bunting!

As do the little triangular bits left over when you cut out circles!
* * *

Flower 1 - Simple Paper Strip flower

Take a 1.5cm / 1/2" strip, that is about 8-9cm / 3 - 3 1/2" long.  Cut the ends nicely, then put a small spot of glue in the centre of Strip 1.  Lay Strip 2 on top, at right angles and press down gently.

Do the same again for Strip 3, laying it across the gap between strips 1 & 2, as shown.

Then do the same for Strip 4, laying it on top, at right angles to Strip 3. 

Cut a slit through all layers in the centre of the flower, then push through a split pin/brad. Open out the back and push it firmly against the back of the flower.

The finished Flower 1.

Flower 2 - Circle-Backed Strip Flower

Cut a circle from cardstock, or stiff paper (plain or patterned).  Use the same punch to trim 1cm / 3/8" wide strips of patterned or plain paper. Place the strip across the centre of the punch, as shown, lining up each end to give you a nice pattern.

Put a spot of glue in the centre of your card/paper circle. Press your first strip onto the glue, lining up the ends of the strip with the edges of the circle.

Follow the method for Flower 1, to create a paper-strip flower, from four strips.

Choose a suitable small button and stick to the centre of the flower.  Alternatively, decorate with a split-pin/brad, as for Flower 1 above.

Flower 3 - Circle-Backed Mini-flower.

Make a smaller flower, by trimming 1 cm / 3/8" strips shorter than the width of a punched circle.  Use the same methods as for Flowers 1 & 2 above.  Decorate with a mini-brad or tiny button.

A Fun Fan!

I made this little fan, using 4.5cm / 1 1/2" long strips of paper (1.3cm/ 1 1/2" wide).

I rounded the ends of the strips, then made a tiny hole near one end of each strip (I have a teeny-hole punch, but you could use a craft knife, a thick needle, or an awl to punch the holes).

The handle of the fan is just one of those "Photo Turns" that you used to get with packs of brads. I used the brad to attach it and hold the whole thing together.

I think it's rather pretty.  This is the prototype - the next one will be measured a bit better and have slightly neater ends. I may also add a couple more strips of paper, to give it more impact.

So, there you are - some paper flowers and a bonus fan!

Obviously you can make these flowers with different widths and lengths of paper strip. You don't have to "fancy up" the ends - they can remain straight.  The flowers can be small - even tiny - or really quite big. 

Also, there is no rule to say you must only use four paper strips. You can use only three, if you fiddle with the angles, or five, six, seven, eight... multi-petalled flowers can look great!

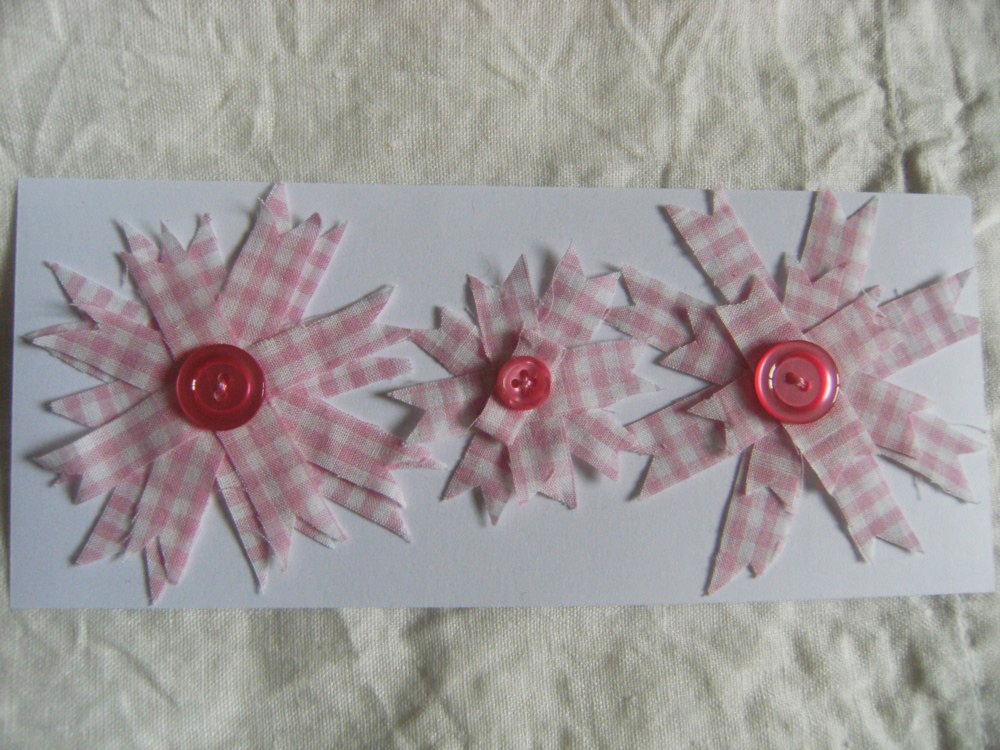
The flowers don't have to be made of paper either - how about these ones, made from cotton gingham strips?


Or these, made from ticking tape?


Or ribbon ones?

I've seen similar flowers made from old envelopes (the coloured inside bits of business envelopes are fun), or newspapers and magazines.

You are only limited by your imagination!

LinkWithin

Related Posts Plugin for WordPress, Blogger...