Monday 30 November 2009

Moving In Day

I've started moving stuff into my New Workroom!! Wooo! I am still so excited about this. I've been looking forward to it for months and months. Now I finally have a workroom that I don't share with the washing machine, dryer, fridge, freezer, laundry, ironing pile and cleaning equipment!!

There is still a bit of mess in here and I can't get all my stuff upstairs yet - partly because I need to add more wall shelves (which I will have to buy!) and partly because it's all a bit much for my back, which is on strike today. I may have to just cope with the stuff I have brought in so far - and do a little project by way of celebration!


Oh, and the other good news - we have a Dining Room again! Yesterday we invited my niece, her husband and the baby to dinner. 

We ate dinner at the table for the first time in weeks - because it was no longer covered in J's models (moved yesterday morning), or my crafting stuff - put in boxes.  I even ate my breakfast at the table this morning.  You can even see that we have a desk and a chest of drawers, instead of them being obscured by model-making equipment!


Sunday 29 November 2009

Woo Hoo!

I am writing this on my New Laptop sitting at my New Desk in my New Workroom! Woo hoo!


As you can see, there isn't much here, except the shelf unit, the wall shelves, the desk and drawers, my PC, paper cutter and cutting mat, by way of "Token Moving In"!

D. has been lovely and helped me all weekend.  We moved all of J's model stuff from downstairs in the Dining Room, to his new room, onto the shelves that we put up specially. Everything has a place and there is even room for expansion!

Then he moved the stuff around for me, so I could decide how to lay it all out. There is a fair bit more to do and I need to get more shelf space organised, but the basics are here now. I at least have a Desk to work at and could bring the most important stuff upstairs and stow it away. The rest will have to follow as/when I have time and space.

I am very excited!

Saturday 28 November 2009

Slowly But Surely

Well, we are getting there - gradually. The shelf unit is finished and we've almost finished J's shelves etc in his room.  Progress, but slowly. Today I've had sore kneck and shoulders, so we've had to slow down and do much less than expected.


The shelves are nearly finished and the stuff is pretty well organised now.


Now we have to put the desk together and decide where it all goes! Another trip to Ikea will be needed, to sort out more shelves and a few other bits & bobs, but I should be able to start moving my stuff and using the room at last!


Friday 27 November 2009

This Week I Have Been Mostly Making Books and Furniture...

Well, my last post was about the Furniture, so this one will be about the Books!

Having finished the Tutorial mini-book, I was inspired to make some more stuff for my Etsy shop. I hope you like them!

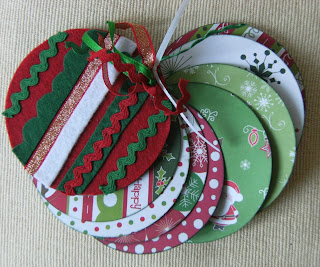
This circular mini-book is decorated with felt and ribbons, to look (a bit) like a Christmas decoration.  The pages are covered with papers from the Papermania Christmas range.


This is a "Beer Mat" book! The covers are made with plain mats that are normally printed as pub beer mats. I have used Daisy Bucket papers for the whole album. The edges of the covers and pages are inked with red, to give them a nice finish.


I am quite proud of this one! It's a traditional style Album, with a two-piece hinged spine.  The covers and pages are bound together with ribbons.  The useable area of the pages is 8" by 6", which is a nice size for scrapping or photos. I added just a line of glittery sparkle to the cover, to give it a nice finish. The back cover and hinged panel are covered with silver cardstock. All the pages are cardstock too.

I made the pink felt-covered album to go with the amazing papers in the accompanying kit.  They are from the Christmas collection in a range called "Say it with a  SMIRK". I think they're fab!  I made up the kit by trimming the papers to suit and adding ribbons and embellishments. 

I really hope someone will buy it and have a great time scrapping their Christmas. 
Hopefully I'll do well over the Holiday Season - especially as I'm offering free shipping on seasonal stuff.

D.I.Y. or Don't I.Y.?

Patience - First Up... take a short trip over to Heather's blog and follow the link there, to see a short video of an amazing piece of art-work. Stunning!

To return to the business of the day.... If you happen to have read my Tuesday post, you'll know I took a trip to the local branch of That Swedish Shop. 

I put together J's new desk-chair and the tall DVD unit that he's going to use to display models or store paperbacks (the jury is out on whether he wants a red display unit and a blue paperback library...)  On Wednesday I put together the new table for J's room (waiting for him to come in from school and help me stand it up, as it weighs about 20 tonnes!)


As you can see from the clutter, it's already in use and appreciated!

That was Tuesday & Wednesday.  Then I was busy with other stuff, some of which I have yet to blog.

This morning I thought I would be awfully clever and save dear D. a bit of work this weekend.  I put together this for my new workroom:

Pardon the weird angle and the junk on top, but this is my new drawer unit, which may sit under the desk (or it may not...
Feeling very pleased with myself (for good reason, I feel), I thought I'd continue and see how far I could get with assembling the shelving unit and accompanying desk.  The instructions were very straighforward and, although the top and side pieces look chunky, they are hollow, so weigh very little.

 
This is how far I got.
 

DIY is not always as simple as it seems.  The screws will not go into the base, to fix the side on.  They just push the side away and threaten to damage the rest of the unit.
I thought it would be a good plan to put the top on first, but when trying to line it up with the four pegs on the top central divider (no longer attached in the photo), I broke a dowel off at the level of the hole.  Thinking it would be a good plan to take out the dowels and turn it through 180 degrees, to resolve the problem of the broken one, I snapped another dowel too.

Cue lunch time!  I will have to ask D to help me after all. It's obviously a 2-person job - one to hold it and one to hit it! I suppose that should have been obvious - carried away by my first success, I obviously switched off my common sense.

I think I'll stick to blogs and housework for the remainder of the day.
 

Thursday 26 November 2009

Poor Puss-cat!

This morning I bribed (and slightly bullied I'm afraid I have to admit... though I felt mean) our dear cat, Sherlock into his carry box.  We set off for the vet, for his annual booster jabs. 

Well, I am so glad we went.  The vet weighed him and said he'd lost nearly 2lbs in weight in a year. That's a fair bit for a cat.  He has looked a little thin and scraggly recently, but we put it down to the onset of Winter and his fur getting its winter coat.

She took blood tests, for kidney, liver and thyroid function.  They have to send away the thyroid test, but their equipment allows them to get a kidney and liver function report in 10 minutes (!) so we waited to see what it said.  His urea levels were all wrong.  He has kidney problems.  The vet has given him daily tablets and put him straight onto a special renal-formulated diet.

He did have his booster, but has to return in 3 weeks for a follow-up appointment.  We have to monitor him and make certain he drinks plenty (and wees regularly). If not, we may have to take him back sooner, to be put on a drip for 24 hours.

If we hadn't gone to the vet today, he could have got very sick indeed. I am glad we got there. We should've gone last week, but were delayed twice. At least he's getting the right treatment now.

Hopefully the thyroid function test will come back ok and there are only kidney problems.  He has been a little more sleepy than normal, but we also put that down to the weather. It's more likely that he's been feeling unwell.  I am trying not to feel guilty about it. It is hard with cats because it's not often obvious that they are unwell, until they're very sick!  We're just lucky to catch it now.


Love that daft old cat! Get Well Soon Shocky!


Wednesday 25 November 2009

Ikea De-brief...

Well, I went into battle yesterday morning at the crack of... oooh, 9:30am (well they don't open til ten!).

I went prepared, with my shopping list, on which were printed the warehouse aisle/shelf locations of the large items (the internet is a wonderful thing!). 

I found a trolley, located a Man with Muscles (hee hee, no lifting allowed for me!) and went in pursuit of my Bargain Table.  The website said they would have only 5 in stock, so I was slightly anxious - after all a discount of £70 is not to be sniffed at! However, they were well prepared, with a huge pile of the tables in the middle of the warehouse (cue photograph, which I never thought to take! This will have to do...)


So, I bought the table for J's room and these for my New Workroom (woo hoo!)


The staff were so helpful and even sent a chap to push my trolley to the car and load the stuff for me. 
Once they were in the car, I went back for Round 2!
I went to the Showroom and spent ages playing with desks and office chairs.  Finally I decided that, lovely though they are -
 

- the glass or draughtsman's table tops and adjustable trestles were just to large for my small workspace. I was quite sad, as I'd rather set my heart on that big white table, with the drawer unit supporting one end and one of the trestles at the other (with the idea that I would buy the other trestle later, so I could adjust the height of the table and even tilt it if I needed to).  But if I had bought those, there would not have been room for anything much else! 
In the end I went for this idea: -


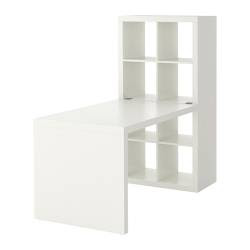
The desk fixes to the middle of the shelf unit, which leaves plenty of room for other stuff. I am considering the idea of a folding table-top - maybe the same as the one we put in J's room.  Then I can have extra work space if I need it, but it will stow away when not in use.
I had to settle for a white desk, although the bookcase is birch finish, because the birch ones were out of stock.  However, the drawers I have bought (and the others that I would like to buy) are white, so I hope it will all go well together.  We will see!

So having brought home my treasure, this is the current situation -

The piles of timber are my new shelves (right) and J's new table (centre).  The box on the left contains the desk and somewhere is buried the box with my drawer unit in!


J now has his new chair (red!). The tall, narrow blue thing is a DVD storage unit.  However, once he has fetched all his models from the dining table (Saturday afternoon job), this will be a display unit for J's favourites. It has no shelves yet, as he needs the models in order to decide where to put the shelves - so great that they are adjustable!
Next trip, I will pick up a silver or red one, to be put in the convenient little space between the wardrobe and the window.  We think it will be an ideal home for paperback books.  It has a bracket to screw to the wall, so no danger of it falling on anyone's head!

That's the Story So Far... watch next time for the next exciting installment!

The Giveaway Winner Is....

Well, decision made about the giveaway.  I had 16 responses to my Tutorial Post on Saturday, however, not everyone did what I asked them to do to qualify for the Giveaway (though not all commenters wanted to be entered).

After a few opinions from others (which pretty well co-incided with my own), I wrote down the names of the five commenters who answered the questions about other posts in the Creative Circle Blog Party. 

These were:
  1. Cherry
  2. Francine
  3. Tracy
  4. Heather
  5. Margi
I then went off to Random.org and got a random number from 1 to 5.  It selected 5, which is Margi. 


Margi said...


So very very fun and I'm definitely trying your project, great instructions BTW!


1. Jacky's Card - Xmas Tilda card in Green, Red, and White


2. Gemma's Photography - custom wall art with a kewl frame and hers was a Natural World theme. Very kewl technique.


3. Sian's Scrapbook Page - ruffly (too kute) scrapbook page with their 2010 garden resolution!

Well Done Margi! I'll be in touch for your details, so I can post you your little mini-book.

Hard luck everyone else, but I hope you really had fun on Saturday.  Keep an eye open - I can feel another Giveaway coming on... if I get time before Christmas there may be another little book or something else nice up for grabs.  Otherwise I'll make you something for the "January Sales"!

Off to add new mini-books to my Etsy shop!

Tuesday 24 November 2009

A Bit of a Problem... Opinions Needed!

Okay, so I posted a Tutorial on Saturday, for the Creative Circle Blog Party.  And I offered a Giveaway. 

I asked for a Comment and for the commenter to answer 3 questions about other people's posts from the Blog Circle. 

I got 16 Comments, but only some people included answers to the Questions.

So, do I just accept all 16 comments and select one winner at random?

Or, do I only choose from those who followed "the rules"?

Or do I compromise and ask the winner to answer the questions (if they haven't already), before they can have their prize? 

I would welcome opinions, as I'm a bit unsure what I should do.

Monday 23 November 2009

The Shopping List

Well, I did my Monday jobs and came home again. I then took a sandwich, glass of water and a banana, rounded up my pc, some paper, pencil, tape measure and ruler and went upstairs.

I measured, I scribbled, I thought, I re-measured, scribbled some more, thought some more...

I sat in the Office, at the big desk and turned on the big PC. I drew a carefully measured rectangle, pushed a few buttons and drew some more careful rectangles.  I went in search of the scissors and cut out the small rectangles. Then I arranged them on the carefully measured big rectangle and thought a bit more.

I then started the Shopping List for tomorrow... because, of course, tomorrow is Ikea Day! I have a trip planned, to buy the stuff necessary to turn a semi-empty "spare room" into a Workroom!

 I have Big Plans for my Workroom, based on several months' consideration, cogitation ..and a bit of noseying into other people's blog photos, to see how they have their space organised.

Also have promised J that he can have a large folding table that is on special offer this week, also a nice desk-chair, so he can be comfortable while he works.

I added the items I "need" to the list, along with some useful storage options, boxes etc. 

I scrolled to the bottom and looked at the total.

£££££

Hmm... The List takes up 2 pages of A4 (including small thumbnails). I think I need to prune it to one sheet of A4.  Problem... I "need" everything on it!  Or J does.

I can see that I need a "This Month, Next Month, The Month After" approach.  The problem must be solved because I don't think the bank manager will be happy otherwise.

Off to tidy up my paper and pencils and search for my Pruners!

Dopey Dates!

Well, I just went back to check what I'd said about the closing date & time for my Blog Party Giveaway. 

I put 12pm GMT on Monday 24 November.  Well, duh! 24th is tomorrow (which you probably can work out is not Monday).  I had better keep the Giveaway open til 12pm on 24th, just in case... don't want to upset anyone. 

So, here is a last opportunity to take part!  Go back to my Saturday Blog Party post and use the links by the questions, to work out what answers to give. Then leave me a comment with the answers to the three questions. 

If you have entered and answered the questions by 12pm tomorrow, you may be the lucky person selected by the Random Number generator.  If so, I will send you your prize.  Don't forget to leave me a way to contact you, in case you win!

Sunday 22 November 2009

Treasure!

As I have said many times now, I have an online shop.  It is at Etsy and I'm very proud to be a member of the Bookbinding Etsy Street Team (BEST for short). 

Etsy has a system called Treasuries, where you can view small galleries of items from different sellers. Each Treasury is curated by an Etsy member (seller or buyer, so long as they have an Etsy id).  The Treasury lists are limited to a certain number. You can only start a new list when the existing ones have expired so there are less than 333 of them.  Then the lists open and you can sometimes grab one of your own. 

Until this week, I had never managed to snag a Treasury.  This week I have managed to grab two!  I got one this evening and have filled it up with things that are vaguely Snow related, from the BEST Team's offerings.  It's lovely! Why not take a little look? Snow and Snowflakes Treasury

A Day's Work

Well, it was all very exciting in the Blogging for Scrapbookers course world yesterday! Parties and tours round the world kept me very busy.  I needed a good night's sleep to recover! It was fun though, and I found some people I hadn't met yet and who I might follow from now on, as well as collecting ideas for layouts, cakes, mini-art, cardmaking, photography, writing, all kinds of stuff!

Today has been hard work, but worth it.  We have almost finished J's new bedroom.  We put up two rows of shelves and moved some of his stuff onto them.  There's a set of lighting for his desk and some cute pen and pencil pots on a rail where he can reach.


I'm off to Ikea on Tuesday, to buy the rest of the things for him and stuff for my New Workroom!!


This is the current state of my new workroom! Lots of sorting out to do.

I have to make some final decisions about the storage and desk, then make a list of all I have to buy, before I go off to Ikea. 

Last time I went there for a load of stuff, I bought all the "big stuff" and took it through the tills first.  They sent a nice chap to help me load it into the car.  Then I had a snack in the cafe, and went back for Round 2 - a small trolley for all the little things!  It worked so much better than trying to get everything at once and as it's fairly quiet there on a weekday, it wasn't too much trouble to stand in line twice.

Next weekend I hope we'll clear out the rest of J's stuff and start organising mine.  He will have a couple more shelves on the rails (that I will buy in Ikea), a table that folds down and a new desk chair. Also a little DVD unit, as it will be ideal for paperbacks and will fit in the tiny space between his wardrobe and the window.

I hope that by the end of the weekend, I may be able to start moving my equipment into its new storage area and even to start a project at my new desk! I think there will be several more weekends of work before it's all done, but there is definitely progress now!  The Plan is beginning to work.


* * *
Another Award!


Something I didn't blog yet was this award from the wonderful Mel 

I was delighted to receive this from her for being "a worthy blogging type" who "well deserved" it!   (I did thank her and apologise for not being able to blog it sooner!).

So I have to carry out a few tasks connected to the Award:


1. thank the person who nominated you for this award   - Thank You Mel!

2. copy the logo and place it on your blog.  Did that!

3. link to the person who nominated you for this award - See above!

4. name 7 things about yourself that people might find interesting. Hmmm...


Seven things about myself, that people might find interesting.  That's quite a challenge.. I will try.

  1. I love crafting - my favourites are scrapbooking, making cards and binding books
  2. I am learning bookbinding as I go along - I hope to go on some courses. I want to make traditionally bound books.
  3. I have an online shop on Etsy, where I sell various books, sock pets and custom ordered scrap layouts/ albums
  4. I have a sister and it's her birthday today (Happy Birthday!)
  5. I used to be a computer analyst and programmer, then a school dinner lady!
  6. I love teaching and would like to teach craft classes
  7. I have an ambition to be on the creative team of a crafting site or magazine.

There, hope that's at least slightly interesting...


5. nominate 7 Kreative Bloggers.

6. post links to the 7 blogs you nominate.


Rinda at Gallo Organico, for all the hard work she did, organising our Creative Circle Blog Party this weekend!

Jo "Curlyscrapbooker" for amazing Christmas Cake recipe and lesson, and being a generally cool blogger!

Amy whose clean, simple scrap designs, with journalling as a central feature are so refreshing and inspiring.

Kirsty because she always has something great to say or show on her blog, and she's one of the reasons I started scrapping at all.

Shimelle who needs no introduction to most of my blogging friends, but who really should get more awards; besides she's my favourite scrapper!

Jane Dean of Seabreezes, a fab and wonderful designer, artist and scrapper, whose books I have bought and whose blog I've followed for the longest time...

Rachael of La Fuji Mama, who I follow on Twitter too and who always has something lovely cooking at her place!


7. leave a comment on each of the blogs letting them know they have been nominated. but of course!

I really hope all these lovely people are glad to have the award - I am certainly glad to send it on to them. Cheers Ladies!

* * *
 
Finally
 
Dont forget that the giveaway from my Mini-Book Tutorial Post on Saturday is still going. Read yesterday's post, check out the other people whose blogs were taking part in the Creative Circle Blog Party (start at Rinda's blog HERE if you want to go straight there!).
 
Then leave me a comment and answer the three questions asked about the Party Hosts work. 
 
I will select a winner at random tomorrow, from all posts received.


Saturday 21 November 2009

Creative Circle Blog Party!

Welcome All! 

This is the final post of today's Creative Circle Blog Party! I hope you have had fun so far and will enjoy my little Tutorial today.  There's a giveaway for you too - all you have to do is leave me a comment, answering the questions at the end of the post. 

As you may have gathered, if you have not been part of it yourself, the posters at the Blog Party have all been following a course given by the amazing  Shimelle, "Blogging for Scrapbookers", which ended yesterday.  This party is by way of celebration for the fab time we've had doing the course, and the interesting folks we have met along the way.

(If you did not reach this Post via the previous Party Host and would like to join in, go to Rinda's Blog HERE to start the Circle, or find your place again if you are "lost".)

I started my blog as part of this course, so I have never written a Tutorial Post before.  Please bear with me if it isn't quite right, but I'll do my best.   I hope the photos I have posted to illustrate the tutorial will be clear enough for you. 


Create A Circle Mini-Book

This little mini-book can be used for scrapping your Christmas memories. You could use any decorative papers, for any occasion, or even make it with plain or lined paper and use it as a note-book or journal for some special event!  Plain art paper would create an attractive and unusual photo album for a relative's Christmas gift.  You could cut square or oval shaped pages - even different shapes, to make the book personal to you.  The principles are exactly the same and it's very straightforward to do. 


You Will Need:
  • Two 3.5"/9cm circles of thick card, chipboard or thin wood (eg. ply or hardboard), for book covers, with a hole near edge
  • Sheets of thin card
  • Several sheets of your chosen paper or cardstock for pages
  • Paper for Front and Back Covers
  • Paper for Inside Covers
  • A Book Ring or D-Ring, big enough to hold pages and allow them to be turned.
  • Glue - strong pva, spray adhesive, strong glue-stick
  • 3.5"/8.5cm circle punch or die-cutter (I used a Huge-size punch from Woodware); or large scissors, compasses/ruler and card for page template
  • Small hole punch or mini-drill
  • Ribbon(s) to decorate
  • Inks for edging (optional)
  • Paint for covers / edging (optional) 
Step 1

If you are making your covers yourself, do this first. 


I used ready-cut chipboard circles, which came as a chipboard mini-album (mine was by "Kars", but there are many makes available from good scrapbooking suppliers). 

If you are cutting the book pages by hand, the cover can be used as a template.


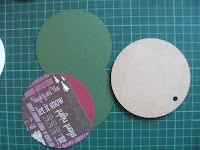
Punch or cut 8 or 10 circles from thin or medium card.
These circles will support your paper or cardstock pages.

Choose a weight of card that will allow the pages to be stiffish, but not too thick. This will depend on your choice of covering paper/cardstock.

Step 2


Punch twice as many circles from your choice of paper or cardstock.
These circles are your pages. 

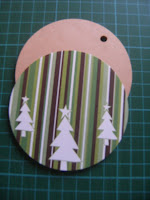
You may like to punch part-circles, as shown in the second picture and use them to make patchwork style pages.  This is a good way to get the most out of your sheets of paper, as you can use up edge-pieces or parts that will not allow a whole circle to be punched. The effect can be very attractive too.


Step 3


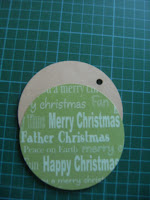
Cover each side of every card circle with paper, as shown.  As you can see, I used some whole circles and some pieces, to make a varied set of pages.

As you do this, try to plan ahead, so that you have paired each page with the one that will be facing it and the one on the other side. This will help your book to "flow" nicely and look professional.


Step 4


Choose matching or contrasting paper and cut a front and back for each of the book covers.  The pictures above show some ideas.

I chose to have one side plain and one patterned for each cover. 

I then put the patterned-side out for the front cover, with the inside plain; and patterned inside for the back cover, with the plain side outwards - to make the inside of the back cover match the other pages. 

It's your choice how you do this!


 Step 5


Use a contrasting or toning colour of ink to colour the edges of the cover boards. You could also use acrylic paint, chalk (and fixative!), brush-pen or even coloured pencils.

Also ink round the edge of the hole for the book-ring. You don't need to ink right into the hole, as this will not be seen once the book is assembled.

Remember to allow plenty of time for your ink or paint to dry, as it can smudge all over the pages.

If you want to, you can also ink the edge of each page to match or contrast with the cover.


Step 6


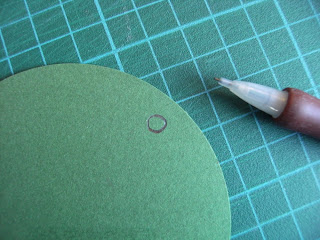
Using the cover as a template, draw inside the book-ring hole, to show its position.


Use a punch to make holes in the papers for the front and back covers.

Stick the papers on either side of the cover boards, matching the holes carefully.

A variation on Steps 5 & 6 would be to decorate the book covers with acrylic paint, inks, fabric or collage.


Step 7
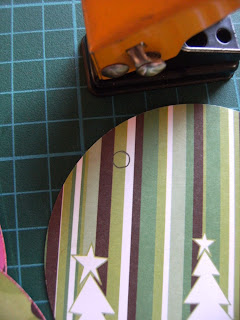


For each page of the album, use the cover as a template and mark the place to punch a hole for the book ring. 

Take care to mark the hole in the correct place on each page (in my case the top left edge).  

Check both sides of each page before you mark it and always mark the front side of the page, so you don't end up with holes the wrong way.


Punch each hole in the place you have marked.


Step 8


Arrange pages in order from back to front, with the covers in the correct place. 

Open out the book ring and slide each page into place, starting with the back cover and working forwards.
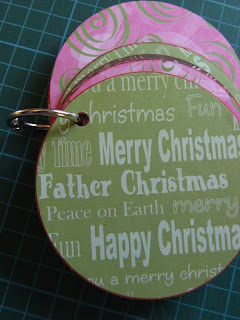


Close the book ring to fasten the book together.

Step 9


Lastly, cut pieces of matching ribbons to approx 6 ins / 15cm.  Tie these round the book ring in whatever pattern you like, to decorate your finished book.

Pat yourself on the back, for a job well done!


* * *

Thanks for reading my mini-book tutorial.  I hope you have found it useful and will be inspired to make your own Christmas Mini Album.  Perhaps you may like to come back again from time to time.  I hope to post other tutorials, ideas and recipes, along with my general waffle and scrapping news.  You'll be welcome any time!


* * *


Creative Circle Blog Party Giveaway!


If you would like a chance to win the Mini Book shown in the tutorial, please do the following:


1) Leave me a Comment

2) Answer this question in your comment -  during your journey through our Blog Circle, what were the subjects of these items? 
  1. Jacky's Card
  2. Gemma's Photography
  3. Sian's Scrapbook Page

3) Remember to leave me a way to contact you, in case you win!

I will collect all Comments left by 12pm CA time / 8pm GMT Monday 24th November.  The winner will be selected randomly from all who have got the questions right!

Good Luck! 

* * *

Finally, a big Thank You to Rinda, who organised our Creative Circle Blog Party! I hope you have enjoyed it. Why not return to her blog and leave your comments - Rinda's Blog.


And don't forget to enter Rinda's Giveaway on her blog too.


 * * *


A Note for any Local Visitors - Scrapbooking Club News

If you live close to Bedford, you may like to know that the Bromham Scrapbooking Club meet regularly, at the Scout Hut. We are a newish group, small and friendly and we welcome new members. You don't need to be an "expert" or even "experienced" at scrapping. Drop me a note in the Comments (with a contact link!) and I'll give you some more details and dates for our next meetings.


* * *


LinkWithin

Related Posts Plugin for WordPress, Blogger...